 Place Bill ( Drawing Editor )
Tool summary :
Also see :
|
|
- Drawing Editor (where Place Bill is a tool)
- Bill of material (topic)
- Bill data (topic)
- Bill of Material Layout (Fabricator Setup options for Place Bill )
- "Bill of Material" tab in Drawing Presentation (Fabricator Setup options for Place Bill )
- Setup considerations for bill tools
- A bill's edit window (double-click the placed bill to open)
- Undo (works for Place Bill )
page 1 | contents | objects > bill of material > | bill of material | top
 Example (also see the step-by-step instructions ) :
Place Bill is usually used to place a bill of material onto a sheet outline.
|
page 1 | contents | objects > bill of material > | bill of material | top
 Step-by-step instructions (also see the example ) :
The following instructions assume that you are using a 3-button mouse.
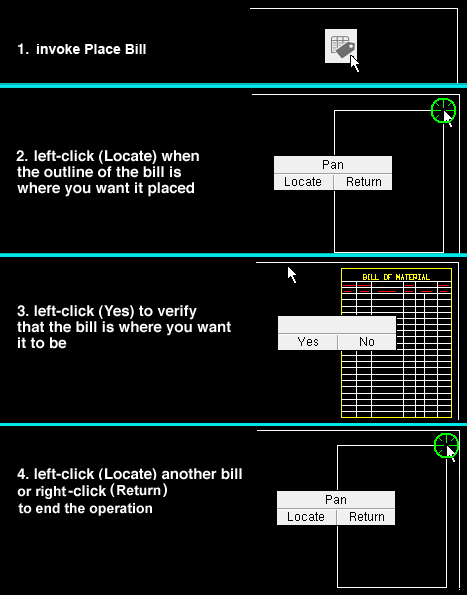
1 . While on a sheet outline or other drawing type in the Drawing Editor , invoke Place Bill using any one (1) of the following methods:
Method 1 : Click the Place Bill icon. The icon can be taken from the group named ' Objects -- Bill of Material ' and placed on a toolbar (classic) or the ribbon (lightning).
Method 2 : If " Drawing Editor layout style " is ' Classic ', you can use the menu system to choose Objects > Bill of Material > Place Bill .
Method 3, 4 or 5 : Place Bill can also be invoked using a keyboard shortcut , the context menu , or a mode . For the ' Lightning ' layout style, configuration of the interface is done using Customize Interface .
2 . Locate- Pan -Return mouse bindings become active. The outline of the bill is displayed so that its upper-right corner snaps to wherever the point location target is at. The size of the outline is determined by the number of lines entered in step 3 and by the setup options selected for Home > Project Settings > Fabricator > Sheets and Reports > Bill of Material Layout .
|
|
|
bindings |
3a (optional) : Select the Locate icon that you want (if its not selected already).
3b : Place the mouse pointer (
) so that the upper, right-hand corner of the bill snaps to the location where you want it, then left-click ( Locate ).
3 . The status line reads, "Verify bill of material," and the bill of material is shown on screen. Yes - No mouse bindings become active.
|
|
|
bindings |
Alternative 1 : Left-click ( Yes ) to accept the bill's placement and continue.
Alternative 2 : Right-click ( No ) to go back to step 2.
4 . The outline of another bill is displayed. Locate- Pan -Return mouse bindings become active.
|
|
|
bindings |
Alternative 1 : Follow these instructions beginning with step 2 to add another bill of material.
Alternative 2 : Right-click ( Return ) to end the operation without adding another bill.
Tip: You may at this point want to Save or Save As to save the changes you have made to this sheet outline (or other drawing type). If you find that you don't like the results of the Place Bill operation, you can Undo .
For information on editing, deleting, moving and compiling information into a bill of material, see bill of material .
page 1 | contents | objects > bill of material > | bill of material | top


